
You could occasionally run into unexpected data technical or functional issues when using Sage 50 software, which can be frustrating and confusing. This type of error is typically caused by damaged or corrupt Sage data files, and it can occur for a variety of causes, such as an incorrect network connection or data path. Sage 50 Database Repair Utility is capable of repairing such faulty data files. Therefore, it is advised that you read this blog all the way through if you are unsure of how to use this tool and to obtain a comprehensive explanation of how to use Sage 50 Database Repair Utility to repair Sage 50 data.
What are the Reasons for Corrupted Sage Data Files or Improper Data Paths?
Damaged Sage data files or an improper data path can be caused by a number of factors.
Some of the causes listed below are as follows:
- In your Sage 50 data path, the major causes are faulty, missing, or old files.
- It is due to an improper connection between the system’s network and data path.
- It typically occurs when the Sage 50 software Database Engine in Pervasive has some serious issues.
Step by Step Instructions to Download the Sage 50 Database Repair Utility
You must first download the most recent version of the Sage 50 Database repair tool.
To obtain the Sage 50 Database repair tool, follow these steps:
- You must first go to the Windows Start menu and choose the All Programs option
- You must select the Sage 50 Accounting software in the following step
- You then need to enter the Technical Support Utilities and select the Sage 50 Resources and Help option
- The Sage 50 Database Repair Utility must be selected in the final step in order to launch the program.
Suggested Reading: A Required Data File is Missing Sage 50
Things to Do Before you Start the Repair Sage 50 Data Files Process
Whenever you are installing or reinstalling Sage 50 software, you must use a programmer that is 100% compatible with the most recent version of the software. For instance, if you’re trying to install many versions of the pervasive, such as R2011, R2012, and R2013, in a system, you might need to use the 2013 tool version. You will want a 2012 tool to repair the data path if you are using the R2012 edition of Sage 50 software to repair a damaged data path.
Different Methods to Repair Sage 50 Data Files Using Sage 50 Database Repair Utility
There are specific fixes for every problem. Therefore, the Sage professionals also advise fixing this issue. The Sage 50 Data File can be quickly repaired using the indicated error-fixing techniques when moving data to another drive.

To easily get rid of the issue, you should carefully follow the instructions that are going to discussed below:
Method 1: Run the Repair Tool
Sage Peachtree data recovery can also begin the data repair. When it runs, it easily extracts all the relevant company data files. It is useful to check that the tools listed below are operating correctly.
- The End User Licence Agreement dialogue box will need to be clicked when it appears on your computer
- You have the option named “Agree”, simply click on it
- Choose any of the three options shown on your system, which are as follows:
- Remove Pervasive
- Install Pervasive
- Generate a New Local Data Path
Remove/Delete Pervasive
- You must remove the Pervasive from your computer
- Your system should automatically log you in as the Administrator when you log in
- Make sure that nobody else has logged into the system
- Finish up with Sage 50 and then start the Remove Pervasive Utility.
Install Pervasive
- To launch it, select the Install Pervasive Utility option
- Ensure that you are logged in as the Administrator on your computer
- This utility feature will resolve the issues
- The most recent Sage 50 service release version needs to be installed once again.
Generate a New Local Data Path
Simple Sage 50 data paths can be easily created with the use of this utility function. “Factory default files” provide a method for carrying out this process.
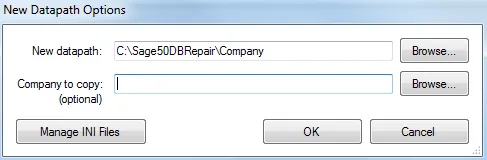
Following are the steps:
- Verify the destination for a new data path that is essential
- In addition to this function, the Company to Copy option assists in moving the complete directory from the previous data path to the new location
- It is simple to go back to the original route using the Manage INI Files option
- After done with that, go to the initial data path
- Choose the “Make Active” option by selecting it
- The program must then be closed
- Install Sage 50 Service Release’s most recent version once again.
Suggested Reading: Sage 50 Company File Check and Repair
Method 2: Make Use of the Create New Local Data Path Utility
- You must first confirm the location of the new data path.
- It shouldn’t be in the same spot as before that is already on the computer system
- The copy option will switch from using the previous data path to using the entire directory The copy failure feature can occur as a result of the system’s pervasive performance or the Smart Post
- But the Services. MSc must be used to terminate these services.
- After that, you must go to the initial data path to handle the INI files permission
- In order to do this, you must first choose the real data path and then hit the Make Active button
- You must then close the Database repair tool after you’ve finished using it
- The data path must now be checked to see if it is active
- The actions listed below must be followed and finished if you plan to use it regularly in order to guarantee that forthcoming upgrades function flawlessly:
- The registry key shown below needs to be searched in the first step, and it should simply be changed to 18 for 2011, 19 for 2012, and 20 for 2013;
- 64-bit machine:-
- HKEY_LOCAL_MACHINE\SOFTWARE\Wow6432Node\Peachtree\Version\\online Update
- 32-bit machine-
- HKEY_LOCAL_MACHINE\SOFTWARE \Peachtree\Version\\online Update
- Following that, you must get ready to accurately update the String values for the Path and Update Path to the new data path you have selected in the preceding steps
- Then, to access the 2021 and 2012 release, navigate to the registry key provided below
- 64-bit machine:-
- HKEY_LOCAL_MACHINE\SOFTWARE\Wow6432Node\Peachtree\Application\
- 32-bit machine:-
- HKEY_LOCAL_MACHINE\SOFTWARE \Peachtree\Application\
- After finishing the aforementioned procedures, you must right click on the Version string in the window’s right pane
- Next, you must click with the right mouse button on the Version string in the window’s right corner.
- You must now choose the Modify option
- Then, go in the Value data area and change the figure’s last digit to 0
- After completing this, press the Ok key
- And then close the Registry editor window
- Reinstall the Sage 50 Service release update on your computer system to complete the process.
Conclusion
Hopefully, the above steps help you with the complete process to utilize Sage 50 Database Repair Utility and repair any Sage 50 data file files using this tool. If you have tried the solutions and you are still feeling anxious, you should seek professional assistance because there may be another major problem that is not visible to users. You can seek assistance from Sage 50 live chat professionals or contact the Sage 50 Helpdesk Team to obtain all error-related solutions.
FAQs: Repair Sage 50 Data Files using Sage 50 Database Repair Utility
Q. What Exactly is Sage 50 Database Repair Utility Tool?
Ans. This tool assists your Sage 50 software in adding, deleting, or changing files in your database directory. By performing a system diagnosis, it can be easier to remove corrupted or damaged files, replace them, and fix your Sage 50 program.
Q. Is Generating a Backup Before Using the Sage 50 Database Repair Utility Required?
Ans. To prevent any data loss, it is usually advised to make a backup of your Sage 50 data before using the repair tool.
Here’s how:
- Log in to the company which you want to backup
- Ensure that you are using Sage 50 Premium or Quantum in single-user mode under the administrator
- Go to the File menu and then select the “Backup” option
- Access the Backup icon by using the toolbar at the top of the Home screen
- The Sage 50 Accounting Backup pop-up asks for the file name
- Pick a place to save the backup
- The location of the file here is where the program stores its backup copies of the files, .SAJ folder shouldn’t be used
- The most recent backup file path is utilised as the default for future backups
- If you are positive that replacing an existing backup is what you want to do, only do it
- At last, click “Ok” to start the backup.
To get the best assistance regarding the Repair Sage 50 Data Files using Sage 50 Database Repair Utility, you can simply dial +1-347-967-4079 to contact our SAGE 50 LIVE CHAT Specialists Team.
Q. How Do I Create a New Data Path in the Same Location?
Ans. The below steps help you to create a new data path in the same location but make sure do not use Sage 50 Database Repair Utility if the existing data path is invalid or incorrect.
- Initially, close Sage 50 on all devices
- Press the Windows Key + R on the PC that is hosting the data
- After typing services.msc, click the Ok button
- If the following services are mentioned, do a right-click on them and choose Stop
- Navigate to the computer’s data path
- OLDDATA should be given to the data path directory
- Peachtree###.ini should then be opened
- In the Datapath= line, modify the path to reflect the directory’s new name from Step 6
- For your version of Sage 50, download and install the Database Repair Utility
- Choose Run if given the option to run or save the downloaded program
- When prompted to continue when the utility opens, select the “Yes” button
- To continue, select “Agree” from the agreement prompt
- Select the button for creating a new local datapath
- After that, press the Ok button
- Enter the initial data path noted earlier from Step 5 in the New datapath field
- Once again, hit the Ok button
- Verify that the Database Repair Utility shows that the operation was successful
- Now, you’re supposed to close the Database Repair Tool
- Visit the OLDDATA folder
- The following folders should be copied and pasted into the newly generated data path by the utility:
- FormsSample
- Any of your company directories
- Turn the computer back on
- And then launch your Sage 50
- Select the Help menu >>> Sage 50 Activation >>> Licensing and Subscription options, and then follow the on-screen instructions to activate the program if it does not do so automatically
- Open Company can be found under the File menu
- Make sure your companies are there and operating normally.