
QuickBooks Error 1920, which states Error 1920: Service QuickBooks Database Manager (QBCFMonitorService) failed to start,” can occasionally be brought on by installing or updating QuickBooks Desktop. QuickBooks Database Server Manager needs QBCFMonitorService (QuickBooks Company File Monitoring Service) in order to connect the desktop application and the QuickBooks company file. The QuickBooks Database Manager cannot function if the QBCFMonitorService is broken, corrupt, or absent from the system, which results in problems with installation and updating QuickBooks. This article will offer thorough troubleshooting advice as well as some insight into the error-causing factors.
Let’s dive into this comprehensive troubleshooting guide to show you how to avoid the problem.
What Do you Understand with QuickBooks Error 1920?
When your system encounters Error 1920, service QuickBooks database manager failed to start, it means that the server manager for the QuickBooks database was not accessed successfully. QuickBooks error 1920 appears whenever the QBDBMgrN tries to connect to a desktop hard drive but is unable to do so due to some restriction. When it tries to access a drive on the desktop, the same error message will show up.
Users are also prevented by QuickBooks error 1920 from installing QuickBooks because the QuickBooks Database Service Manager cannot search the hard drive for installation files. Hence, accessing the firm files and these processes both become cumbersome. Understanding the causes of this inaccuracy is crucial because of it.
Factors that Could Lead to QuickBooks Error 1920
The error “database server manager failed to start” can have a few different causes.
The following are a few typical causes of this error:
- If QuickBooks’ installation or removal was unsuccessful.
- If the operating system malfunctions, you might experience this error.
- This problem may be brought on by invalid entries in the Windows registry.
- If there is a power outage or the system is improperly shut down, you can experience a similar problem.
- Any kind of malware or virus attack.
- This error could occur if QuickBooks’ crucial files were accidentally erased for whatever reason.
Users may experience severe effects of QuickBooks Database Manager Error 1920 as a result of the triggers mentioned above. It’s possible for multiple error messages to appear at once, each pointing to a different issue. Additionally, it’s possible that users won’t have access to the company file. It could become too difficult to install or update the application. Additionally, if this error is present, the system’s performance may suffer. Due to the QuickBooks Desktop Error 1920, adequate troubleshooting is therefore required right away to prevent QuickBooks from ceasing to function altogether.
IMPORTANT: If there are any problems with QBCFMonitorService, you might see some of the following common error messages.
- “QBCFMonitorService.exe has encountered a problem and needs to close”
- “Access violation at address FFFFFFFF in module QBCFMonitorService.exe. Read of address 00000000”
- “QBCFMonitorService.exe has stopped working. Windows is checking for a solution to the problem”
- “QBCFMonitorService.exe has stopped working. A problem caused the program to stop working correctly. Windows will close the program and notify you if a solution is available”
How to Get Rid of QuickBooks Error 1920?
The database server manager isn’t connected to your company file, which results in the QuickBooks installation error 1920. If you’re trying to install QuickBooks for the first time on your computer and run into difficulties, you should install QuickBooks as a Windows user with administrator permissions.
To quickly resolve QuickBooks error 1920, you can also follow the instructions below:-
Case 1: When Users Try to Install the QuickBooks update
Use the steps listed below to install a new version of QuickBooks or update QuickBooks to the most recent release.
Step 1: Uninstall QuickBooks Desktop
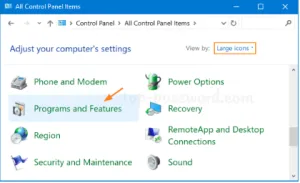
- To find and open the control panel, press Windows key + R keys together to open the Run window
- Choose the features and programs, or uninstall a program
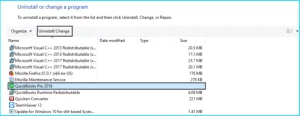
- Select QuickBooks Desktop from the installed programs list
- Choose the “Uninstall” or “Change” option and follow the on-screen directions.
Step 2: Rename the Installation Folders
If the application data or program data folder is not visible, you will need to show hidden files and directories or use Windows’ built-in file search. Moreover, if there are any other Intuit applications installed on the computer, just remove and rename the QuickBooks version folder located in the Intuit folder.
Refer to the following path after navigating to the installation folders:
| Windows 10/8/7 | Windows Vista |
| C:\Program Data\Intuit
C:\Program Data\Common Files\Intuit C:\Users\[Username]\AppData\Local\Intuit C:\Program Files\Intuit C:\Program Files\Common Files\Intuit | C:\Program Data\Intuit
C:\Program Data\Common Files\Intuit C:\Users\\AppData\Local\Intuit C:\Program Files\Intuit C:\Program Files\Common Files\Intuit |
- To launch the run command, simultaneously press the Windows key and the R key
- Input the folder’s location and press the Enter key at the same time
- Rename the folder by doing a right-click on it
- Finally, rename the folder a new name .OLD.
Step 3: Install your QuickBooks Desktop
After completing the previous two steps successfully, you must now install the QuickBooks Desktop.
- Initially, prepare for the installation of your program
- Next, install the QuickBooks Desktop
- Open the downloaded file (QuickBooks.exe)
- Observe the on-screen prompts and consent to the software licence agreement.
- Choose the Next button
- After entering your software’s Product and License codes, select the “Next” button
- Select the install type that is best for you
- Express the install
- Custom and Network install
- Finally, activate the QuickBooks Desktop.
Step 4: Setting up QuickBooks Desktop to Make Use of New Company File Name
- In this step, you should launch QuickBooks
- Open or restore an existing company is found under the QuickBooks File menu
- Next, select the next tab after opening the company file
- Choose a new name for the company file once that is finished
- To open a tab, click on the same.
Step 5: Try to Resolve the Error Manually
- First, rename the QuickBooks company file
- Open the company file and the QuickBooks Desktop
- To access the product information, press the F2 key or Ctrl + 1 keys
- hunting down the location of the company file specified in the file information
- Close the QuickBooks Desktop application
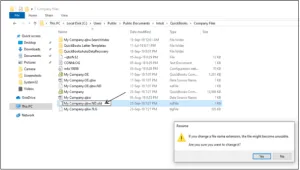
- Go to the location of the Company file
- Users of Windows 10, 8.1, and 8 will need to right-click the Windows start tab and then choose File Explorer
- In order to open Windows Explorer, users of Windows 7 and Vista must right-click on the Windows start tab
- After doing a right-click on the File menu, choose the rename option
- Press the Enter key after typing the new name of the company files
- At last, you must click “Yes” when Windows asks for your approval before performing an action.
Case 2: When You are Trying to Upgrade Your QuickBooks Database Server Manager on the Server System
If QuickBooks is not on the server, you can still complete the following steps by using the Database Server Manager to share the file over the network.
Step 1: Uninstall the QuickBooks Database Server Manager
- Press Windows + R while performing this action
- The run dialogue box will appear and type appwiz.cpl followed by clicking on the Ok button
- Now, move to the QuickBooks Database Server Manager
- In the end, choose uninstall/change and then follow the on-screen directions.
Step 2: Rename the Installation Folders
This step is similar to the previous case 1 process. In this process, you must make hidden files and folders visible if you can’t see program or application data. Moreover, if you have additional Intuit applications installed on the computer, you should only delete or rename the QuickBooks version folder located in the Intuit folder.
Suggested Reading: QuickBooks Utility Application
Refer to the following chart while browsing the installation folders:
| Windows 7/8/10 | Windows Vista |
| C:\Program Data\Intuit
C:\Program Data\Common Files\Intuit C:\Users\[Username]\AppData\Local\Intuit C:\Program Files\Intuit C:\Program Files\Common Files\Intuit | C:\Program Data\Intuit
C:\Program Data\Common Files\Intuit C:\Users\\AppData\Local\Intuit C:\Program Files\Intuit C:\Program Files\Common Files\Intuit |
- To open the run command, press the Windows key and the R key simultaneously
- Press the Enter key after entering the folder’s location
- Choose rename from the context menu when you right-click the folder
- Renaming the folder to .old will put an end to the procedure.
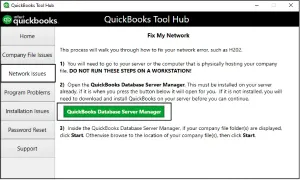
Step 3: Reinstall the QuickBooks Database Server Manager
Reinstalling the QuickBooks Database Server Manager and configuring file sharing are the final steps in this procedure. The Database Server Manager is typically used to run QuickBooks Desktop’s multi-user access. This Server Manager makes it possible to simultaneously work on the same company file.
The following are the steps to download and install Database Server Manager:-
- The database server manager must first be downloaded and installed on the server system
- The computer hosting the company file is known as the server system
Important Note: Installing them in order is advised if you are a professional accountant or bookkeeper or if you host many instances of QuickBooks Desktop on your network. This implies installing the oldest version first and then installing the most recent version.
- After that, you must close every open program on the server device, including QuickBooks
- Now, open the Setup QuickBooks.exe file that you downloaded and install it
- One by one, adhere to all of the on-screen instructions
- QuickBooks will advise selecting an install type, followed by a custom or network option and then switch to the “Next” tab
- Make sure not to select express as well
- I would click the next button after selecting the chosen network setup option
- The Database Server Manager is installed by both options
- Clicking on I’ll be utilising as well as storing QuickBooks Desktop on this device is advised if you wish to have both QuickBooks Desktop and Database Server Manager on the server machine
- If you simply want the Database Server Manager installed on your server system, be sure you choose I won’t be using QuickBooks Desktop
- Continue to follow the on-screen instructions, and when you are ready, click on the “Install” option and also Windows may request the permission at the end of the procedure.
Winding Up!
Hopefully, you will able to resolve the QuickBooks Error 1920 after carrying out the above-discussed troubleshooting. In case you are still having trouble installing or updating QuickBooks Desktop or experiencing the same error message then feel free to ring up our QuickBooks Helpdesk Team. Our Experts can quickly diagnose the issue or concerns with a quick resolution LIVE CHAT.
Frequently Asked Questions
Q. Will Removing all Junk Files and Folders From Our System Fix QuickBooks Error 1920?
Ans. You can remedy your problem by clearing the garbage folder on your computer.
Simply follow the instructions below:-
- Click the Start button on your Windows desktop and type “cmd” in the box that appears
- Hold down the Ctrl and Shift keys while pressing the Enter key
- Choose “Yes” in the permission dialogue box
- On the black box, type “cleanmgr” into the blinking cursor
- Choose “Yes” to start the cleanup process
- To proceed, check the boxes next to the useless files you want to delete, then click the “Ok” button.
Q. What are the Procedures for Giving the Windows user Account Administrative Rights? Does it help me to Avoid QuickBooks Error 1920?
Ans. Yes of course, to a certain extent it might help in fixing the error code 1920.
Here’s how to do:
- Go to the settings on your system, if Windows 10 is installed
- Next, you can select the Control Panel by clicking the Windows Start button
- Now, go to the Accounts >>> Family and Other Users
- Choose Change Account Type from the drop-down menu
- After that, choose on Administrator in the Account type section
- To access Windows, click “Ok” and then log in using the administrator account
- Try the QuickBooks Desktop program’s installation and update once again.
Q. Where Do I Locate the QuickBooks Database Server Management Setup?
Ans. One of the important components of the QuickBooks Desktop software is the database server management. The component comes set up with the desktop application itself. When you choose custom and network install, the installation process installs a database server manager, which synchronizes changes between workstations and the server.