
Small businesses can operate from anywhere at any time with the help of the updated and improved technology that are now available in the accounting field. One of the most advanced accounting programs available right now is Sage 50. Wholesale distributors may easily manage payroll, bookkeeping, and payments with the help of this program, formerly known as Peachtree. Along with numerous additional ground-breaking features that facilitate the filing of annual taxes. With the help of this blog, you can effortlessly Print 1096-1099 Forms in Sage 50 using the instructions suggested in the below section.
Need Expert Help: Are you getting Print 1096-1099 Forms in Sage 50 and don’t know how to solve it? In that case, you must get immediate help from our Sage 50 experts by dialing the ReConcileBooks helpline number at any time.
Understand Print 1096-1099 Forms in Sage 50
In general, a vendor is referred to as a 1099 and is understood to be a person who often works for you but is not listed as one of your employees. If you ever pay one of these suppliers more than $600 in a fiscal year, you are required to give them an IRS Form 1099. This is why these merchants are typically identified. Even if they are not paid more than $600, the form 1099 must be sent in order to maintain your accounting records.
Steps to Print 1096-1099 Forms in Sage 50
Suggested Reading: e-Filing 1099s and 1096s form Sage 50
Form 1096 is often required if paper 1099 forms need to be sent and is mandatory in most cases. Combine your 1099s and add a separate 1096 for each set of 1099s when mailing them to the IRS. 1096 should always be printed on preprinted paper rather than plain paper because it is a machine-readable form.
To print the 1096 form correctly and prevent undesirable errors, carefully follow the steps below:-
- Start by inserting the blank 1096 form that has been preprinted into your printer
- Select Forms, then Tax Forms, from the Reports & Forms menu in the following step
- The Select A Report or Form box is also shown in Printing the New 1099-NEC in Sage 50
- Next, select between Form 1096 – Preprinted and Form 1096 – Preaddressed
- After that, print from the option labelled with Forms menu
Suggested Reading: Sage 100 Reconcile 1099 Vendor Amounts
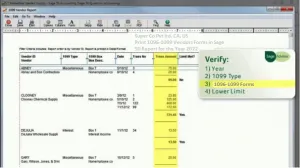
- The Preview and Print filter screen for Sage 50 is shown
- After completing the aforementioned process, check again to make sure the payroll’s year is accurate
- Once done then provide the contact information for your company in the “Name of person to contact” area of the printed 1096
- Next, select Alter Restrictions if you want to manually modify lower government-imposed limits
- Additionally, you can customize the lower limitations in the 1096 Lower Limits window
- Continue to the next step by selecting the same payment types in the Payment Method filter as when you prepared the 1099s
- Click Print/Email when you have finished configuring the filter window in this step
- Finally, select a new printer by clicking the drop-down arrow in the Name column and then clicking it.
Steps to Print 1099 Forms in Sage 50
Before printing 1099 forms, make sure to apply the most recent Sage 50 updates to guarantee that your Sage 50 forms are compliant with federal regulations. Prior to the payroll (calendar) year’s end, produce your vendor 1099 documents. Follow the instructions below precisely to print the 1099 form and prevent any unintended issues.
Suggested Reading: Install Sage 50 2020 Payroll Tax Tables Update
- Pre-printed blank 1099 forms should be loaded into your printer as the first step
- Select Tax Forms from the Reports & Forms menu after the next step and then select Forms
- You can choose between printing 1099-MISC forms or 1099-INT forms for suppliers’ miscellaneous income statements as required by the IRS (used to generate 1099 interest income statements for vendors, as required by the IRS)
- Then, on the Select a Report or Form window, click the Preview and Print button that is visible underneath the sample image
- After completing the aforementioned step, verify that the payroll year is accurate
- If you want to manually modify the lower limits set by the federal government, use the Alter Restrictions option
- Next, choose or input a vendor ID range in the Filter vendors by section or go with the default of all vendors
- In the Payment Method filter, choose the types of payments to include when generating 1099s
- When you’re through configuring the filter window, move on to clicking Print/E-mail
- Sage 50 presents the default printer in the Print dialogue as your next step
- Click the drop-down arrow in the Name column and select a different printer to print to
- At last, click “Ok” to begin printing the forms.
Suggested Reading: Setup Sales Tax in Sage 50
Conclusion
Hopefully, the above-discussed steps help you to easily Print 1096-1099 Forms in Sage 50. If in chance you got stuck in between the steps or need assistance, feel free to connect with Team of Experts by dialing +1347-967-4079 Sage Helpdesk Team. Meanwhile, you can reach out the team via our LIVE CHAT option.
Frequently Asked Questions
Q. Can We Change 1099 Vendor Settings in Sage 50 U.S?
Ans. Yes, you can modify the settings of 1099 vendor in Sage 50 U.S:
- Launch your Sage 50 U.S. Company
- Select the Maintain >>> Default Information and then Vendors from the main menu.
- After that, select the 1099 Setting tab
- Choose the necessary GL account, then pick the right choice from the drop-down menu
Important Note: All of the accounts in your Chart of Accounts are shown, but you only need to make adjustments to the ones you use to pay your 1099 vendors. These are frequently expense accounts, cost of goods sold accounts, or inventory accounts.
Examples: Paying rent or paying a 1099 vendor back for supplies may require you to alter the 1099 option.
Q. How Do I Identify the Type of Vendor?
Ans. The below are the steps to identify the type of vendor:
- The first step is to launch your Sage 50 U.S. Company
- Next, choose Maintain and then Vendors from the main menu
- After that, choose the 1099 vendor
- Select the 1099 Type under the General Tab (Interest or Independent Contractor)
- At last, click on the Save button.
Q. What are the Steps Involved in Entering the Tax ID or Social Security Number for a 1099 Vendor in Sage 50?
Ans. The below are the steps involved in entering the Tax ID or Social Security Number for a 1099 vendor in Sage 50:
- Initially, select Maintain and then Vendors
- Next, click on the relevant Vendor ID
- Select the Purchase Info tab
- In the Tax ID Number section, enter your tax identification number or social security number
- After that, click on the Save button
- For each applicable Vendor, repeat steps 2 to 5.
Read also: Sage 50 Payroll Tax Calculation Errors