
You may quickly import customer credit notes in QuickBooks online to save up more time for your company. You just require appropriate steps for import customer credit notes into QuickBooks. No need to fret if you’re having trouble Import Customer Credit Notes in QuickBooks; this article will make it simple for you. This article will bring you through quick and easy steps so you may focus on other business-related tasks while saving time.
What Can I Import Customer Credit Notes into QuickBooks?
You can import data into QuickBooks Online with ease, giving you more time to focus on your business.
You may easily import customer credit notes into QuickBooks by doing the following:-
- For each invoice, credit notes can be imported as a total value OR with several line items.
- It supports multi-currency.
- There is no need to convert your VAT codes to QuickBooks VAT code formats before importing because VAT codes are already mapped.
Note:
It is advised that no more than 100 credit notes can be imported at once.
Step by Step Instructions to Import Customer Credit Notes in QuickBooks
To import your credit notes, review the correct procedures. You should only perform the steps in the order they are listed, following the instructions exactly. The import process may not go smoothly and may result in errors if you omitted any steps or did not follow the sequence order. Thus, be sure to pay close attention while you follow the procedures.
The procedures:
Step 1: Open the Import Credit Notes Tool
- Click the Gear symbol
- Pick Import Data from the Tools menu
- Choose Import credit notes.
Suggested Reading: Export Import QuickBooks Payroll to XML
Step 2: Upload your CSV File
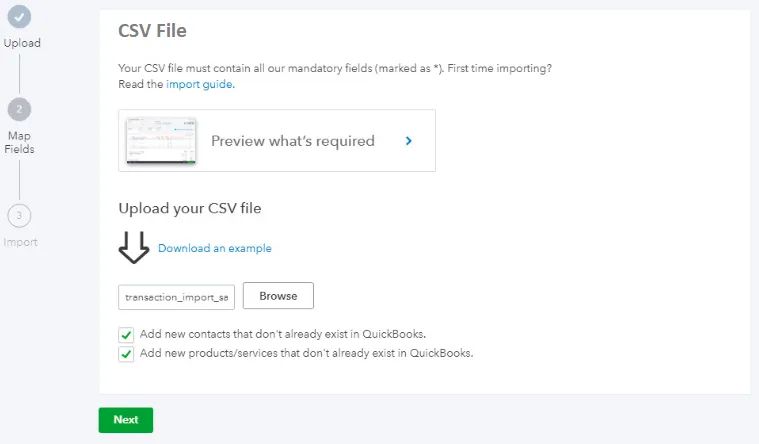
- Check out the prerequisites for importing credit notes
- A sample data file is also offered
- When you have filled out all the required fields, click Browse and then choose your .csv file
Note:
If no line item is specified, QuickBooks will automatically fill this field with a default item called “Sales”.
- Next, you have the choice to automatically add any new clients or line items that don’t already exist in QuickBooks
- If you want to automatically create customers and/or line items, tick the appropriate box(es) and click “Next”.
Step 3: Map Column Headings
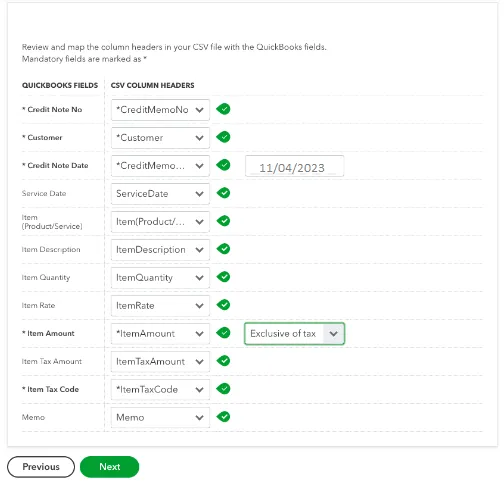
- Asterisks (*) identify fields that are required
- Selecting Not Applicable is necessary for missing fields
- The date format you used should be selected; for example, DD/MM/YYYY
- Choose between Exclusive or Inclusive VAT, if applicable
- Only if QuickBooks has VAT configured are you given this option
- Once you’ve mapped your VAT codes to QuickBooks’, move on to the final mapping page by clicking on the “Next’ button
- Any mapping problems will be identified at this point so you can address them later.
Step 4: Import Credit Notes
- The summary of your import will appear once mapping is finished
- The import procedure can be started by selecting “Start Import”
- An import report will appear once everything is finished
- If any credit notes are unable to import, make a note of the reason why, then choose All Done
- You will then be presented with a final completion report; choose “Ok” to proceed.
Capabilities and Limitations
Important factors need to know to import customer credit notes into QuickBooks:
- If you need to import a lot of new clients or goods/services, you might think about using the following list of import methods.
- Import goods and services
- Contacts for clients, vendors, or suppliers can be imported from Outlook, Excel, or Gmail.
- New product/service items are generated as services and can be modified after import.
- Discounts and negative amounts in general are not permitted.
- If no currency is selected when importing new clients, QuickBooks thinks that the customer’s home currency is GBP.
When credit notes contain numerous line items, make sure each line entry includes the credit note number, customer, credit note date, and other information, as shown in the example credit note 1001, a .csv file.
Suggested Reading: Lowes Synchrony Bank Card Login Issue
Important Note for VAT
- QuickBooks must have VAT turned on in order to import transactions with VAT amounts.
- VAT codes and VAT amounts are not necessary, and your sample file won’t have any VAT columns if VAT is not applicable or switched on in QuickBooks.
- VAT coding is necessary if VAT is applicable or turned on in QuickBooks, and your sample file will also have VAT columns.
- If no VAT amount is supplied, QuickBooks will calculate VAT based on the VAT code.
- When a VAT amount is supplied, it will take precedence over any calculations that QuickBooks would typically perform. Any rounding discrepancies between QuickBooks and other third-party apps are now accommodated.
- Make sure Custom Transaction Numbers is turned ON if you want to keep credit note numbers in your CSV file.
- Enter the item in your CSV file using the format shown below when importing goods or services that need to be assigned to a category: such as Jewelry:Earrings or [category name]:[item name].
Note:
A product’s name cannot be imported if it has already been assigned to a category.

Conclusion
Well, this is how you can easily import customer credit notes in QuickBooks. However, if you still have some query or facing any issues while implementing the import procedures, you can take help from QuickBooks Customer Helpdesk. Our Experts will ensure to provide you with the right set of steps to fix your issues successfully. If you have any specific query, also get in touch with the experts of Live Chat.
A Frequently Asked Questions
Q. How Do I Import all Credit Notes at Once in QuickBooks?
Ans. By using this technique, all Customer Credit Notes will be imported simultaneously. The quickest way to import all Credit Notes is using this process.
- Choose Accounting, followed by QuickBooks Online, from the left navigation
- Opt for the Sales tab
- Now, click on the Credit Notes
- Check the box next to All
- After that, click on the “Upload All” button.
If all Credit Notes have been successfully imported, a confirmation will let you know. Credit Memos for imported Credit Notes will be available in QuickBooks Online.
Q. Can We Perform Automate Order Imports in QuickBooks?
Ans. Orders cannot yet be imported automatically. The manual selection of the button for each order or orders adds a level of inspection that promotes sound accounting procedures.
Q. What are the Steps Involved in Importing Individual Credit Notes in QuickBooks?
Ans. It’s possible that you’d want to import just one Customer Credit Note or to examine the Credit Note first.
How to do it:
- Choose Accounting, then QuickBooks Online, from the left menu
- Moving forward, select the Sales tab
- After that, choose the credit notes
- The Credit Notes you want to import should be chosen as your next move
- Finally, hit the “Upload All” button.
In QuickBooks Online, imported Credit Notes will be available as Credit Memos.