
A Windows program called QuickBooks Web Connector enables data transmission between QuickBooks Desktop and other web applications. Web Connector is a completely different program from QuickBooks Desktop and needs to be installed separately on Windows, but QuickBooks Online already has a built-in Web Connector that operates over the internet. You can read commonly asked questions about QuickBooks Web Connector to get all the answers to your general questions regarding QBWebConnector, and this article will walk you through each step of setup QuickBooks Web Connector on Windows. Make sure to read the complete article thoroughly till the end.
Uses of QuickBooks Web Connector
In order to give users more flexible options, the QuickBooks Online Web Connector application connects QuickBooks Desktop to a number of online third-party apps. The Web Connector opens the .qbw extension files for online applications and facilitates data sharing between QuickBooks Desktop and online web applications. There are more than 500 apps that can be linked with QuickBooks desktop, and each one has a different set of features that must be taken into account in order to get the best results. Intuit® provides a list of these apps on its website.
Many of these programs offer industry-specific solutions for businesses in the manufacturing, healthcare, automotive, accounting, real estate, nonprofit, and many other sectors. Some of these programs interface with QuickBooks POS to manage payments with payment processors. Users can also incorporate programs that simplify commercial operations including customer relationship management (CRM), data security, e-commerce, inventory management, human resources, and many more.
What Products Does QuickBooks Web Connector Support?
All of the versions and editions of QuickBooks products that are listed below support it. Moreover, QuickBooks SDK supports it. It is now simple for you to learn about the different web connector types and the QuickBooks Products they support.
List of QuickBooks products supported by each version of QuickBooks Web Connector.
QuickBooks Web Connector 2.2.0.34 and the Newer Versions
- Canadian editions of QuickBooks (2015 or later versions)
- QuickBooks Enterprise Solutions (2015 or Later Versions)
- QuickBooks Pro (2015 or Later Versions)
- UK editions of QuickBooks (2015 or Later Versions)
- QuickBooks Premier (2015 or Later Versions)
- S. editions of QuickBooks Financial Software products
QuickBooks Web Connector 2.1.0.30 and the Older Versions
- QuickBooks Point of Sale (v4.0 or later) – QBWC 2.1.0.30 or Earlier Versions
- QuickBooks Simple Start (2006 or Later Versions)
- QuickBooks Pro (2002 or Later Versions)
- QuickBooks Premier (2002 or Later Versions)
- S. editions of QuickBooks Financial Software Products
- QuickBooks Enterprise Solutions
- Canadian editions of QuickBooks Pro, Premier, or Enterprise (2003 or Later Versions)
- UK editions of QuickBooks Pro or Accountant Edition (2003 or Later Versions)
QuickBooks Web Connector 2.1.0.30 and the other Versions
- QuickBooks Simple Start (2006 or later versions)
- QuickBooks Point of Sale (v4.0 or later) – QBWC 2.1.0.30 or Earlier versions
- QuickBooks Premier (2002 or later versions)
- S. editions of QuickBooks Financial Software Products
- QuickBooks Pro (2002 or later versions)
- QuickBooks Enterprise Solutions
- UK Editions of QuickBooks Pro or Accountant Edition (2003 or Later Versions)
- Canadian Editions of QuickBooks Pro, Premier, or Enterprise (2003 or Later Versions)
Important Things Must be Done to Setup QuickBooks Web Connector
You must first download and install the QuickBooks Online Connector on your computer before you can set it up. Then you may set it up. Hence, follow these instructions to download and install it first before proceeding with the setup.
Step 1: Download the QuickBooks Web Connector

- From a reliable source, download the QuickBooks Web Connector file
- After that, save the file in the default location, which is the Downloads folder, or modify it as necessary
- After done with downloading your file
- Then File Explorer should be opened
- Then access the file by going to Downloads or the custom location where you saved it
- Perform a right-click on the file when you’ve located it
- Choose the Extract all files to option (folder name)
- Once finished, you must extract all the files into a folder so they may be utilised right away.
Suggested Reading: Download QuickBooks 2023 All Versions
Step 2: Install the QuickBooks Web Connector
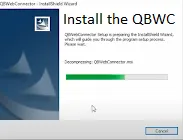
- Once the files have been extracted, you must install the tool
- Do a right-click on the file
- After that, click on the “Run as Administrator” option
- To complete the installation, the install wizard launches
- You must follow the instructions displayed on your screen
- After finished, click the Complete button to complete the installation.
If you Get into a Problem During Installing QuickBooks Web Connection
You can delete and reinstall the web connection if you encounter errors after installation:-
- You must use the keyboard shortcuts Window + R keys
- Then you must choose Ok after entering the Control Panel in the Run window
- You must now choose to uninstall a program
- You must first choose Web Connector before uninstalling
- If QuickBooks Web Connector isn’t listed in the Control Panel, try deleting the QBWebconnector folder in the following locations:
- C:\Program Files(x86)\Common Files\Intuit\QuickBooks\ or,
- C:\Program Files\Common Files\Intuit\QuickBooks\
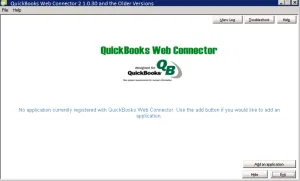
Step to follow to Setup QuickBooks Web Connector
The web connector must be configured before you can use it to connect with third-party applications after being downloaded and installed.
- In the beginning, launch your QuickBooks software service
- Then sign in as the administrator
- Verify that the .qwc file for the third-party application to which you are connecting is on your computer
- Choose the “.qwc Extension File” by clicking on it
- Next, you need to update your Web Services
- Go to the Manage the Web Applications
- With the application name you want to connect, select the Set up option that is shown
- Your browser is changed to the application’s website
- The application requires that you log in here
- You can connect to QuickBooks by clicking the link on the website
- The QuickBooks application should then be opened after it has been connected
- When prompted for an access confirmation, click on the “Done” button
- The setup is now complete, and you may use it with ease.
How to Add an App to Web Connector?
Make sure you sign into QuickBooks as the administrator before signing into your Intuit account. If you have QuickBooks, you can connect it to it .QWC File from your third-party Web Application.
- You must first select a file, update a web service, and then select Manage Web Applications
- The next step is to choose Set up, which is located next to the app you want to set up
- You will be redirected to the app’s website to log in as a result
- On the app website, you must now choose Connect to QuickBooks
- You must then open QuickBooks Desktop and finish the setup process
- On the screen asking for confirmation of access, you must choose “Done” button.
In QBWC, Manage your Application
Make sure you check in to both your Intuit Account and the QuickBooks as an admin
- Choose File menu >>> App Management >>> Manage Web Applications
- After previewing your apps, select Connected Apps to make adjustments.
This process also enables you to remove the app after managing it.
Delete an App
The app can be easily removed from the Web Connector. All data transmission with QuickBooks Desktop will stop working once you remove the program.
- To access integrated applications, select Edit >> Preference
- Next, select the “Company preferences” tab
- Choose the program you wish to remove, click Uninstall, and then click “Ok” button to finish the process.
Transfer an App to your Device
With this function, you can move your program for the same company file to a different system. The connection between the other computer and the app will be broken after it is transferred. Make sure, you use the most recent QuickBooks Desktop version.
- Select the File menu >>> Update Web Service >>> Manage Web Applications to start
- To view and modify your apps, choose the Connected Apps
- Choose Transfer App to my Device after you’re finished
- Upon switching to a new device, the app connection will carry over and then go on to the data transfer.

Conclusion
In this article, we’ve covered the complete process for how to Setup QuickBooks Web Connector. Furthermore, it has discussed the download and installation processes for QuickBooks Web Connector. You are advised to contact the QuickBooks Helpdesk Customer to speak with one of our QuickBooks Live Chat Experts if you have any questions or doubts of any related to QuickBooks Web Connector.
Frequently Asked Questions
Q. How Do I Disable QuickBooks Web Connector Application?
Ans. Start by clicking on All Programs from the start menu. Then, select QuickBooks by clicking Startup. Choose Exchange Data with Web Services by clicking right now. Choose Delete. In order to disable the Web Connection in QuickBooks, click Yes at the end.
Q. How Do I Transfer the Application Once QuickBooks Web Connector Setup is Complete?
Ans. The below steps help you to transfer the application once QuickBooks Web Connector setup is complete:
- Initially, click on the File menu in QuickBooks
- Then select the web service update option
- After that, choose the Manager Web Applications option
- To examine all the applications and make modifications, click on the associated applications
- Choose “Transfer the app to my device” from the menu
- It now switches to a new device for the application connection
- In the end, confirm that the data transfer is continuous.
Suggested Reading: QBWC1085 Error
Q. How Can the Application be Deleted after Setting up the Application in the QuickBooks Web Connector?
Ans. Here’s how can the application be deleted after setting up the application in the QuickBooks Web connector:
- Go to the QuickBooks and select the Edit menu tab
- Choose Preferences from the other options
- Choose the Integrated Apps from here
- The Company Preferences tab should be selected
- Choose the program that you want to remove
- After that, click the Delete button to remove it forever
- By selecting the Ok button, you can save your changes and close this window.