
Sage report designer available in Sage 200 and also in other version of Sage that mainly contains varieties of features which are designed to help user to amend and design multiple reports. To give you complete understanding of Sage Report Designer, we’ve created this articles. Here, we’ll discuss about the Sage report designer guide and the complete steps for the most commonly used features named Sage 50 Report Designer and its other related facts.
Let’s Know Quick Resolutions for Sage Report Designer
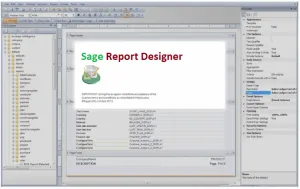
The Sage Report Designer desktop shows the report’s Designer view, which includes the sections, text, and variables that make it up. Many of the panes that make up Sage Report Designer’s capabilities are located to the left and right of the report design.
- Toolbox pane: Using this, you can include many objects in your document, such as boxes, text, and photos. Select the necessary item from the Toolbox window, then click the design area, to add an object to your project.
- Variable pane: This shows any stored snippets as well as the tables and variables that are available to add to the page. Just click and drag a variable onto the design area to include it in your document.
- Report Explorer pane: This displays the document’s organisational structure, including the name of the report, its sections, and the variables and other objects contained in each section.
- File Explorer pane: This displays your report folders and any associated files. Double-clicking the report title in the File Explorer pane will open the file in Sage Report Designer.
- Properties pane: This displays the available conditional formatting choices and object properties for the currently selected object in the design area or Report Explorer window. It displays the basic document characteristics if no item is selected.
Suggested Reading: Pop Ups Blocked When Printing in Sage 50
How to Add Boxes
- Initially, go to the Toolbox menu >> Box
- After that, click on the design and draw to required size and then release.
How to Add Conditional Properties
- The very first, select the object
- Next, navigate to the Properties pane and then select Conditional Formatting
- Now, click on the Finder button
- At last, enter the conditional formatting, if required followed by hitting the Ok button.
There are two methods of conditional formatting that you can use:
- Basic conditional formatting: By using this option, you can specify a filter and then select the format to use when the filter is met from a list of available format options.
- Advanced conditional formatting: With the use of this option, you may input an expression to specify the format to use in a given situation. With this technique, you can format the object using multiple sets of formatting.
Suggested Reading: How to Read a Sage Balance Sheet
To choose the kind of conditional formatting to employ:
- Go to the Tools >>> Options >>> change the Use Advanced Conditional Formatting setting as follows:
- Clear the Use Advanced Conditional Formatting check box to use the default approach
- Select the Utilize Advanced Conditional Formatting check box to use the advanced technique
- Click on the Ok button.
Need Expert Help: Are you getting Sage Report Designer and don’t know how to solve it? In that case, you must get immediate help from our Sage 50 experts by dialing the ReConcileBooks helpline number at any time.
How to Add Criteria
- First, click on the Data and then click Criteria
- Next, you’re supposed to click on the New Criteria.
The procedures listed below describe how to add and modify report criteria in Sage Report Designer.
They include:
- To modify the existing criteria
- Select the necessary criteria in the Report Designer >> Data >> Criteria >> Modify section
- If necessary, change the criteria’s specifics and then hit the Ok button
- In the end, click on the Ok tab once again.
- To remove criteria
- Simply, go to the Report Designer >> Data >> Criteria
- Select Criertia and then choose the Remove tab.
- To use the date picker
- Run the necessary layout or report
- Click the date picker button to the right of the date to criteria
- Then select the necessary time frame, enter any further criteria
- After that, click on the Ok button.
- To change the order of criteria
- Select the criterion you want to move by going to Report Designer >> Data >> Criteria
- When the criterion is in the proper place, click on the “Move Up” or “Move Down” and then click on the Ok button.
How to Add Email Settings?
- Initially, choose the report’s name from the Report Explorer pane
- Next, click on the Properties tab then select Email Options
- Enter the necessary email settings and then click on the Ok button.
In order to transfer documents by email, you must:
- Before you begin emailing documents, configure your default email settings but make sure that you only need to do this once
- You should do this for each document that you want to routinely email by adding the email settings to the document.
How to Add Expressions in Sage Report Designer?
To create computations based on already-existing values in your data, utilise Sage Report Designer’s Expression function. For example, you might want to increase or decrease the size of two distinct columns on a report. Reports, layouts, letters, and labels can all be created with the Expression function.
Suggested Reading: Print 1096 1099 Forms in Sage 50
The steps that demonstrate how to include an expression in your document are as follows:-
Here’s how you can an expression:
- Go to the menu for the toolbox and then select the “Expression” option
- Wherever the new expression should appear in the report, click on the desired location
- Now, an Expression Editor Window will appear and then you’re supposed to type the necessary expression in there
- At last, hit the Ok button.
How to Add Filters in Sage Report Designer?
The records or transactions that appear on a report, layout, letter, or label can be restricted using Sage Report Designer. You must include a filter to achieve this.
Let’s see how:
To create a new filter- Report Designer v1.3 and above
- In the beginning, go to the Report Designer >>> Report menu >>> Filters
- Next, choose the following using drop-down lists:
- Table: Choose the table containing the variable you wish to filter on
- Variable: Choose the variable you want to filter on
- Operator: Choose the operator you required
- Value: Enter the appropriate value.
- If necessary, select “And” or “Or” from the drop-down list; then, repeat step 2 for the second portion of the filter
- Click “Ok” to apply the filter.
To edit an existing filter- Report Designer v1.3 and above
- Move to the Report Designer >>> Data >>> Filters
- Modify the values using the drop-down lists as needed and then hit the Ok button.
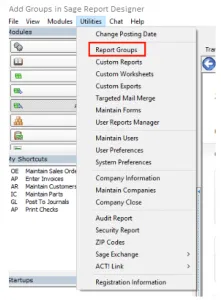
How to Add Groups in Sage Report Designer?
This section is a standard Sage report which will normally be grouped in the following ways:
- Page Header
- Page header 2
- Details
- No Transactions
- Page footer 2
- Page Footer
This implies that Report Designer would give it a name automatically if you added, for instance, another page header.
The steps needs to follow to add a group:
- Go to the Sections tab >>> Add section >>> Page Header 3
- Choose the category of grouping you want to include
- You won’t need to submit any more information if you choose Report Header and Footer or Page Header and Footer because they will be added automatically
- If you pick Group Header and Footer, be sure to choose the table and variable you wish to use to group the document before clicking on the Ok button
Important note:
- To add parts to the report’s beginning and finish, select Report Header and Footer.
- To add sections at the top and bottom of each report page, select Page Header and Footer.
- To add a section that enables data to be summarised and totaled by a defined range, select Group Header and Footer.
- The new part will now appear on the report; if necessary, you may shift it up and down using the buttons on the right side of the bar.
How to Add Images in Sage Report Designer?
- Select Image (embedded) or Image (linked) from the Toolbox menu if necessary
- Click on the design, navigate to the image file and then click Open.
To get the best assistance regarding the Sage 50 Report Designer, you can simply dial +1347-967-4079 to contact our Sage Specialists Team.
How to Add Lines in Sage Report Designer?
Click Line from the Toolbox menu, then click the design to draw it in the desired size before releasing the mouse button.
How to Add Sorts in Sage Report Designer?
- Select Sorts from the Data menu, then Add
- Type in the necessary sort information, then click on the “Ok” button.
How to Add Variables in Sage Report Designer?
- Expanding the table on the Variables pane will allow you to drag and drop the necessary variables into the design.
Modify group or section settings, including section filters
- Choose the necessary section on the Report Explorer pane, then click Properties pane, followed by the applicable option
How to Change Paper Size and Orientation
You simply click on the Page Setup from the File menu.
How to Change Print Setup or Printer?
- Click Page Setup, select Printer, and then click Properties from the File menu
- Choose Page Setup from the File menu, then Printer, Name, and select the new default printer.
Suggested Reading: Sage 50 Printer Not Activated Error Code 20
How to Move an Object in Sage Report Designer?
Use the arrow keys on the keyboard to move the move handle after selecting the object.
How to Rename a Report in Sage Report Designer?
- Select the existing report name on the Report Explorer pane
- Next, click Properties and then click Name followed by typing in a new name, and then press Enter.
Conclusion
This is all about Sage report designer guide. To explore more about Sage Report Designer feature, you can reach out the Team of Experts by dialing Sage Helpdesk Team. Meanwhile, you can use our Live Chat option to easily connect with our Professionals for easy and quick assistance.
Frequently Asked Questions
Q. How Can I Delete a Filter in Sage Report Designer?
Ans. The below steps help you to remove a filter in Sage Report Designer:
- Click on the Report Designer >> Data >> Filters
- Once the Modify Filter window appears, you can click on the Clear Filter
- Alternatively, click on the Clear option, if an Expression Editor window appears
- At last, hit the Ok button to confirm the action.
Q. How to Apply Advanced Conditional Formatting to a Variable in Sage Report Designer?
Ans. Here is the steps to apply advanced conditional formatting to a variable in Sage Report Designer:
- Find and choose the variable to which you wish to apply conditional formatting
- Select Conditional Formatting in the Properties box, and then click the finder button
- Insert your conditional formatting expression in the Expression Editor window, then hit the Ok button.
Q. What to Do if I Need to Delete/Remove a Section in Sage Report Designer?
Ans. When asked to confirm the deletion, click Yes. To remove a section from the document, first pick the necessary section, then click the X button on the right side of the section bar.
Now that section has been removed. When choosing a grouping, sections can also be shifted using the up and down spin buttons on the right side of the bar