
One of the most popular accounting software program, QuickBooks has been providing its users with more and better tools and features with each version it releases. In this blog, we’ll talk about one such issue: the QuickBooks Error Code 401 that users may see when trying to log in or after their access has expired owing to incorrect credentials. The message “The remote server returned on error: 401 unauthorized. Request is not authorized”. In the below post, the error code 401 can be quickly handled by performing the few suggested trouble shootings. Thus, you’re advised to carefully read this post and execute every solutions in a precise manner.
What is QuickBooks Error Code 401?
The QuickBooks Unauthorized error code 401 is essentially an unauthorised request that has various effects on both the online and desktop versions of QuickBooks. QuickBooks error code 401 exists on QuickBooks Desktop, however QuickBooks online encounters QuickBooks API HTTP error 401 (QBO).
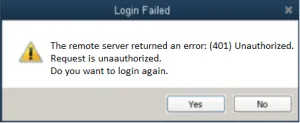
When QuickBooks error number 401 occurs, the following message will appear on your screen:
“The remote server returned an error: (401) Unauthorized. Request is unauthorized. Do you want to login again?”
What are the Reasons Behind the QuickBooks Error Code 401?
You could encounter this error due to a number of reasons while:
- Signing up during the installation of QuickBooks.
- Logging into the company file or the accountant’s toolkit.
- Sending an invoice with QuickBooks payments, a similar problem may occur.
Best Possible Solution to Troubleshoot the QuickBooks Error Code 401
The QuickBooks error code 401 does not have many remedies.
You only need to follow the procedures listed below after the problem message shows on the screen:
- Start by selecting No and closing the error notice window.
- Then download the most recent version of the QuickBooks software.
Need Expert Help: Are you getting QuickBooks Error Code 401 and don’t know how to solve it? In that case, you must get immediate help from our QuickBooks live chat experts by dialing the ReConcileBooks helpline number at any time.
Step by Step Instructions to Update your QuickBooks to the Latest Released Version
There may be a few options for updating the QuickBooks program.
Let’s have a look at:
Step 1: Setting Up an Automatic Updates
You have the option of setting up automatic updates to update QuickBooks to the most recent version. Timely updates are guaranteed and much time is saved by using the automatic updates option.
The steps in this process are as follows:
- By selecting Update QuickBooks Desktop from the help menu
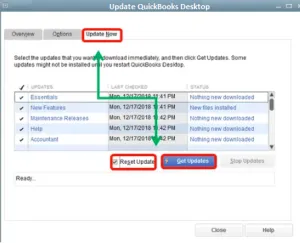
- Choose the “Update Now” tab
- The reset updates checkbox should be selected in order to delete all previously downloaded updates
- To begin the download, you will then need to select the “get updates” option
- Restart the software as soon as the download is finished
- In the end, select the new release installation option.
Experiencing Issues While Setting up an Automatic Updates
If you run into any difficulties while setting up the updates in QuickBooks, follow these recommendations to get them resolved:
- Ensure that your internet connection is active at all times
- Restart Windows using the Safe Mode with Networking option if the problems continue to occur
- The same can be checked by going to Msconfig in the Run window and selecting Safe Mode or by repeatedly pressing the F8 key when the computer is restarted
- After that, choose the Safe mode with networking option
- Try one more to update the software
- Close any open programs and background processes
- This will guarantee that the QuickBooks update procedure is not hampered by any other software
- Moreover, while the updates are being made, you might want to temporarily disable your antivirus program.
Step 2: Schedule for Future Automatic Updates
Creating a schedule for updates is an additional option. The software will update automatically, so you may schedule QuickBooks upgrades to suit your convenience.
Below are the steps that must be taken:
- Start by selecting the update QuickBooks Desktop option from the Help menu
- Afterward, click the options tab
- To enable automatic updates, select the “Yes” button
- You can check the box for each system that says “Yes” to share automatic downloads with other systems on the network
- In the end, click on the “Close” button.
Step 3: Manually Update your QuickBooks Software
In addition to the automatic update process, manual updates are also a possibility.
The procedures listed below will be useful for you if you wish to manually update your software:
- Just close QuickBooks and the company file
- Next, press the Windows start button
- When you’re done, search for QuickBooks Desktop
- Run as administrator can also be selected by right-clicking the icon
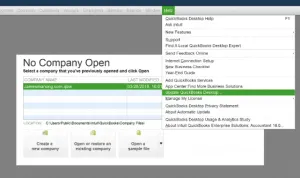
- On viewing the no company open screen, select the Help menu and then hit the update QuickBooks desktop option
- Choose the settings tab, mark everything, and save your changes
- Choose the reset update checkbox while on the update now tab
- At last, choose the option to get updates.
Conclusion
Any of the aforementioned approaches is thought to work in fixing the QuickBooks Error Code 401 when updating the QuickBooks software. To update QuickBooks accounting software to the most recent version, you can use any one of the three processes indicated above. However, if the error persists, you can get assistance from our Experts. Dial +1-347-967-4079 our dedicated QuickBooks Customer Helpdesk to reach our team, and they’ll assist you in solving the error quickly.
Frequently Asked Questions
Q. What are the Other Way to Remove the Error Code 401 in QuickBooks Online?
Ans. The QuickBooks Online Error 401 may be resolved by re-authorizing the connection between your QuickBooks Online file and browser integration.
You should think about the actions listed below:
- Open your web browser
- Choose the Add-ons & Integration menu item
- Choose Uninstall Integration under Actions from the menu
- QuickBooks Online should be chosen from the list
- Log out now, then shut the browser
- Go back to Add-ons & Integrations after logging back in
- Restore QuickBooks Online integration by visiting the Actions page
- To connect to QuickBooks, tap the Connect button
- When your system prompts you to confirm the connection, do so.
Q. What do you Understand with QuickBooks Unauthorised Error?
Ans. The client request was not fulfilled because it lacked appropriate authentication credentials for the requested resource, as indicated by the Hyper Text Transfer Protocol (HTTP) 401 Unauthorized response status code.
Q. What to do If your QuickBooks Remote Access Discontinued?
Ans. The QuickBooks Remote Access feature helps users establish connections to remote computers where the QuickBooks desktop is set up.
- Accessing QuickBooks data folders and transferring and printing files between local and remote computers are just a few examples of activities.
- The Cisco WebEx product, which supports online meetings and communication services, is also compatible with it.
- The QuickBooks Access and Complete Desktop Access versions of the software both provide this capability.
- A smooth process, however, may be hampered by issues like network connectivity between the two machines, permissions configuration, etc.